Documentation
1. What is Transactful?
Transactful is an app to allow your customers to submit refund requests easily, and to allow your customer support team to track refund processing.
Chargebacks have been increasing over the past several years. One particular category of chargebacks is called "accidental chargeback".
These chargebacks are called "accidental" because they are made by customers who have made legitimate purchases. However, for one reason or another, these customers initiate a chargeback presumably due to their forgetting their original purchase or not recognizing the merchant's name on their credit card statement.
This increases the cost of business for online businesses because chargebacks carry with them hefty fees which must be paid to payment processors like Stripe.
Transactful aims to solve this problem so customers can visit a hosted refund-enabled page which explains the origin of the charge, and to request a refund on that same page. This way, businesses can avoid accidental chargebacks altogether.
2. Getting Started
Go to https://transactful.com/start to create your first Refund Page.

Enter your company's name, upload your logo (if you have one), and click Click Page.
Once completed, you will see a set up screen (see below):
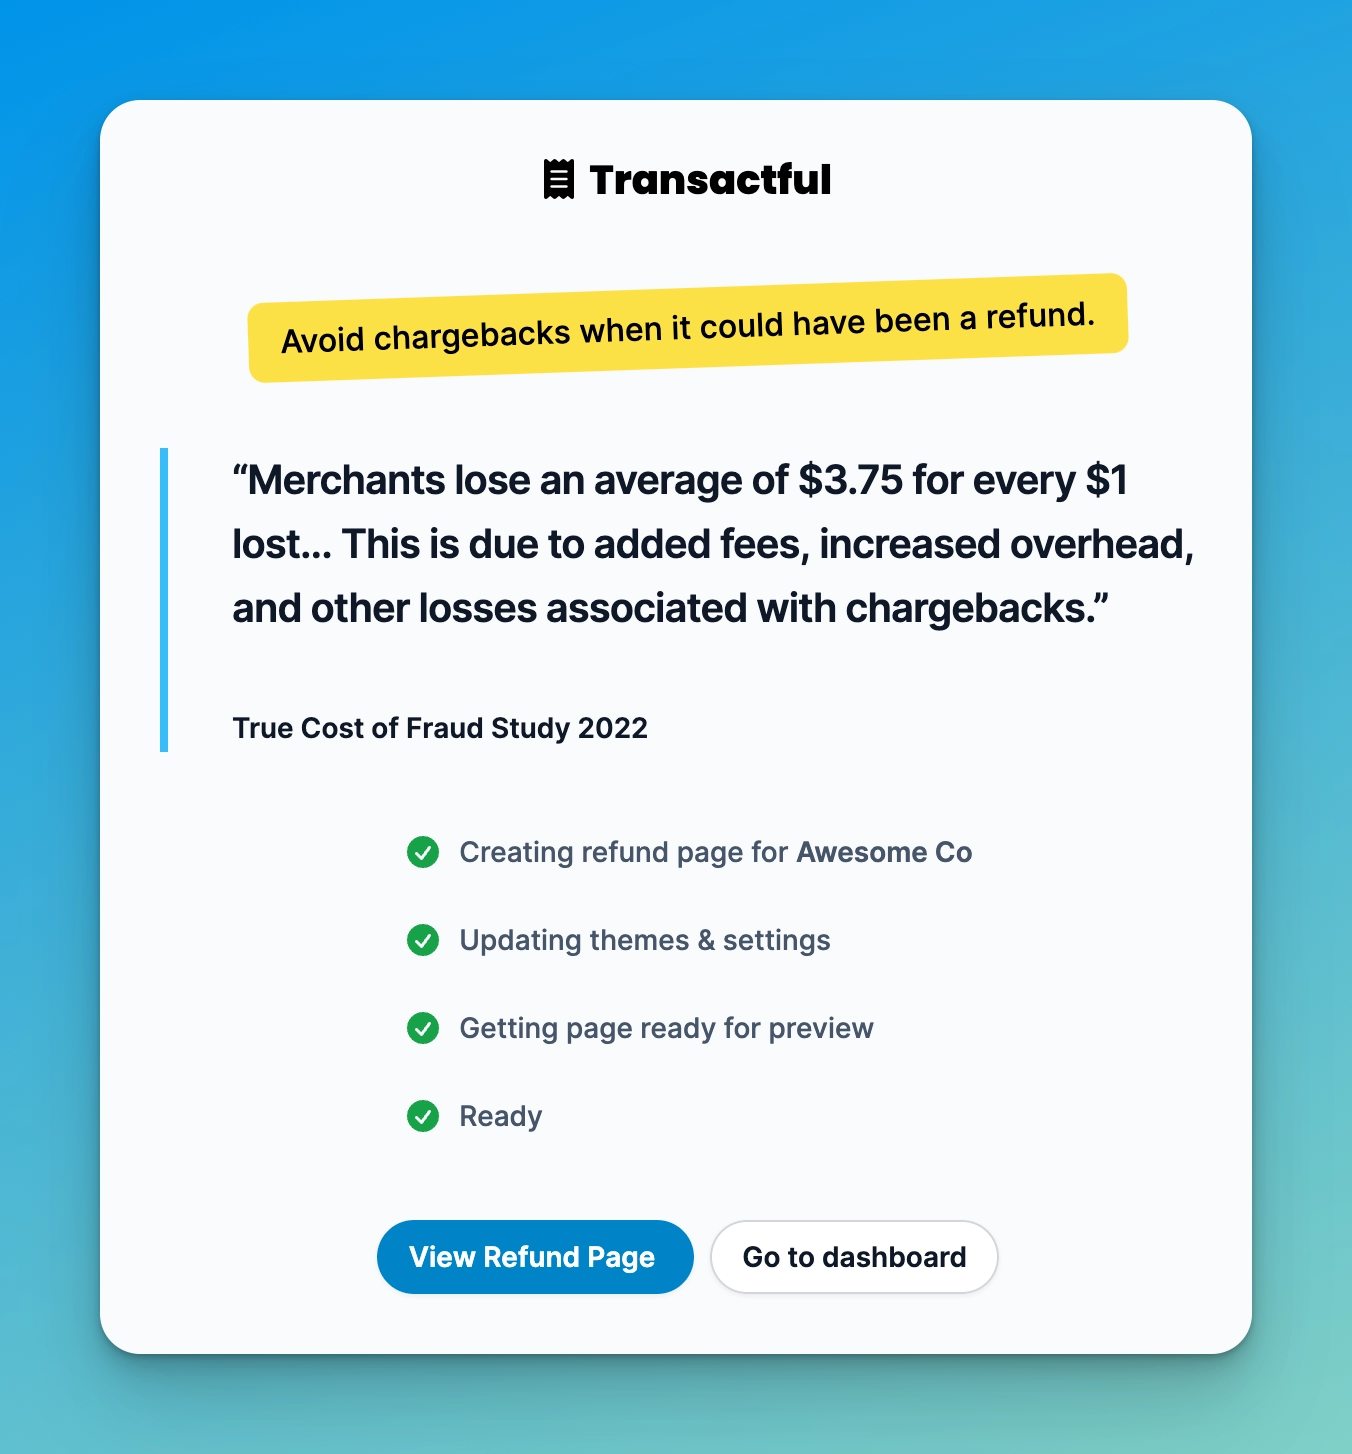
You can now immediatelyl view your Refund Page or you can head to the dashboard to edit the page.
If you click on View Refund Page, you will see your creation in a new tab.
When you're ready, click on Go to dashboard. You will be prompted to create an account at this point.
We need to create an account so that you can come back to your saved work later.
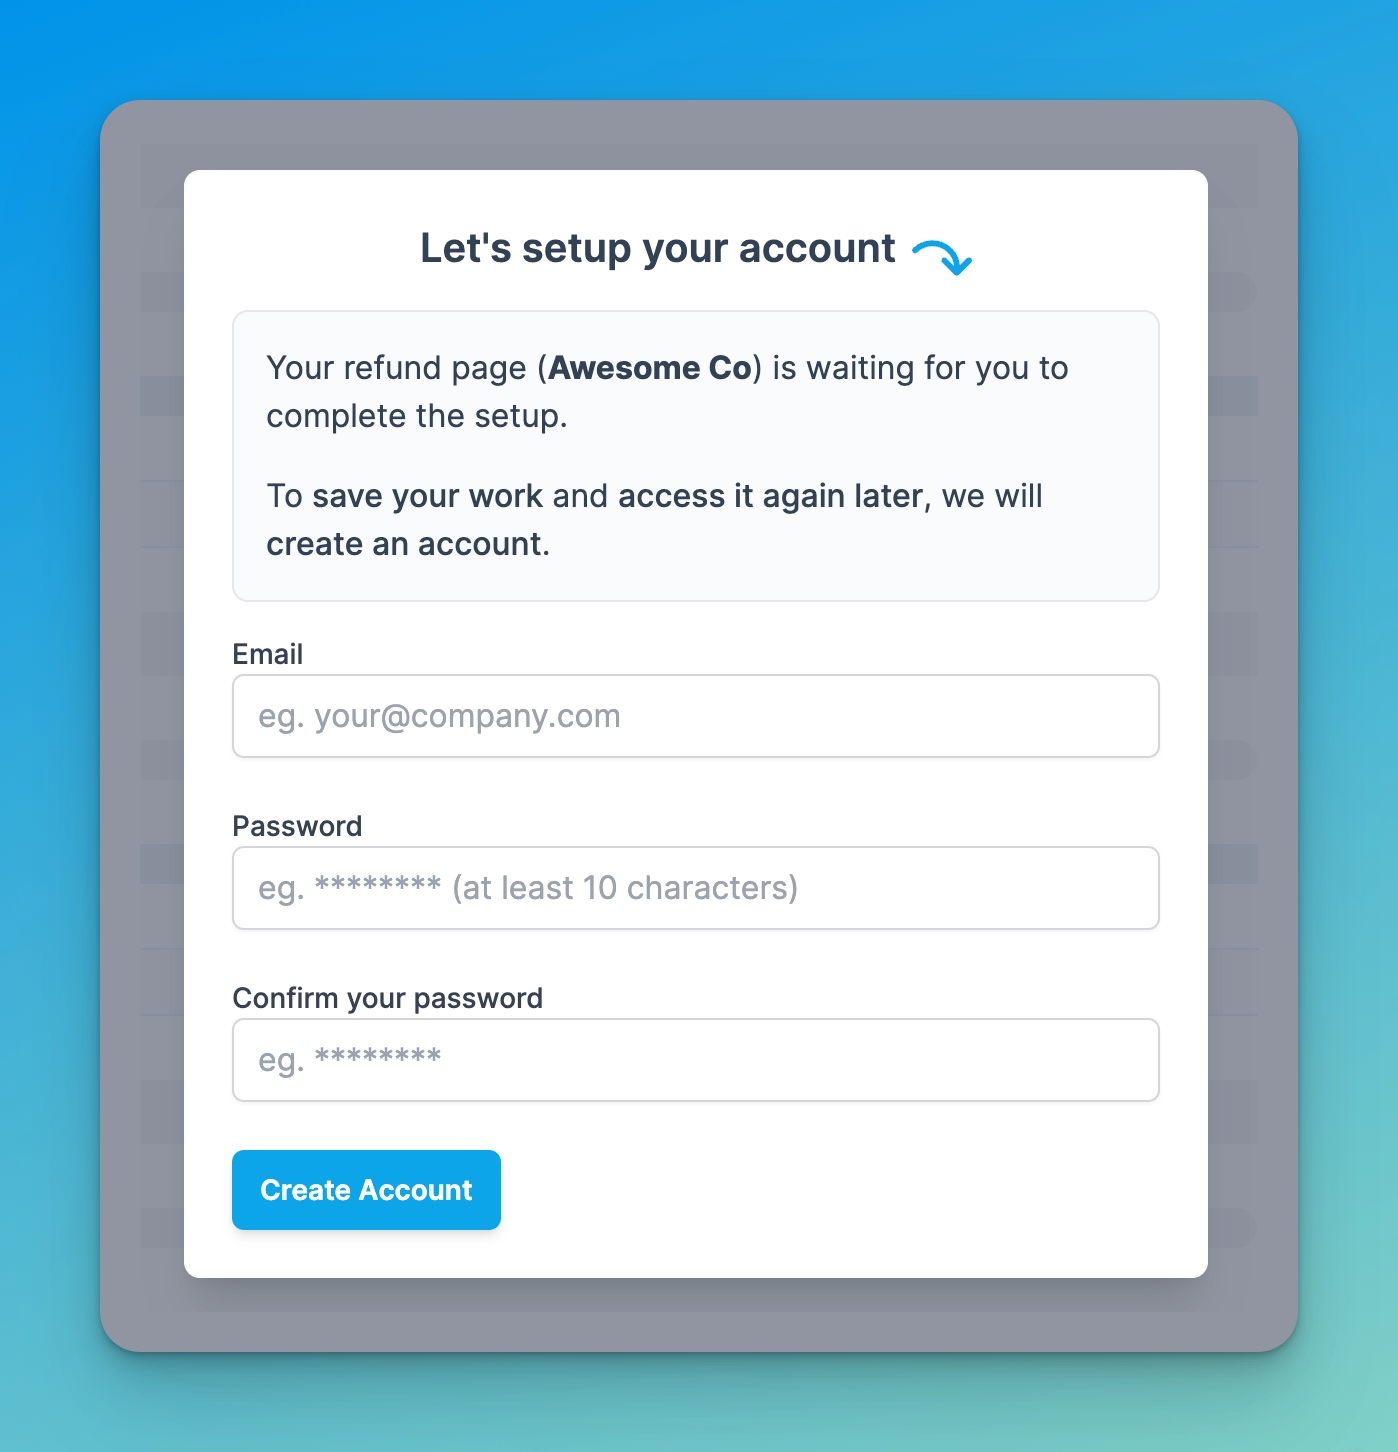
When you create an account, you will receive a verification email to confirm that we have your email address. When you receive the email, remember to click Verify Email.
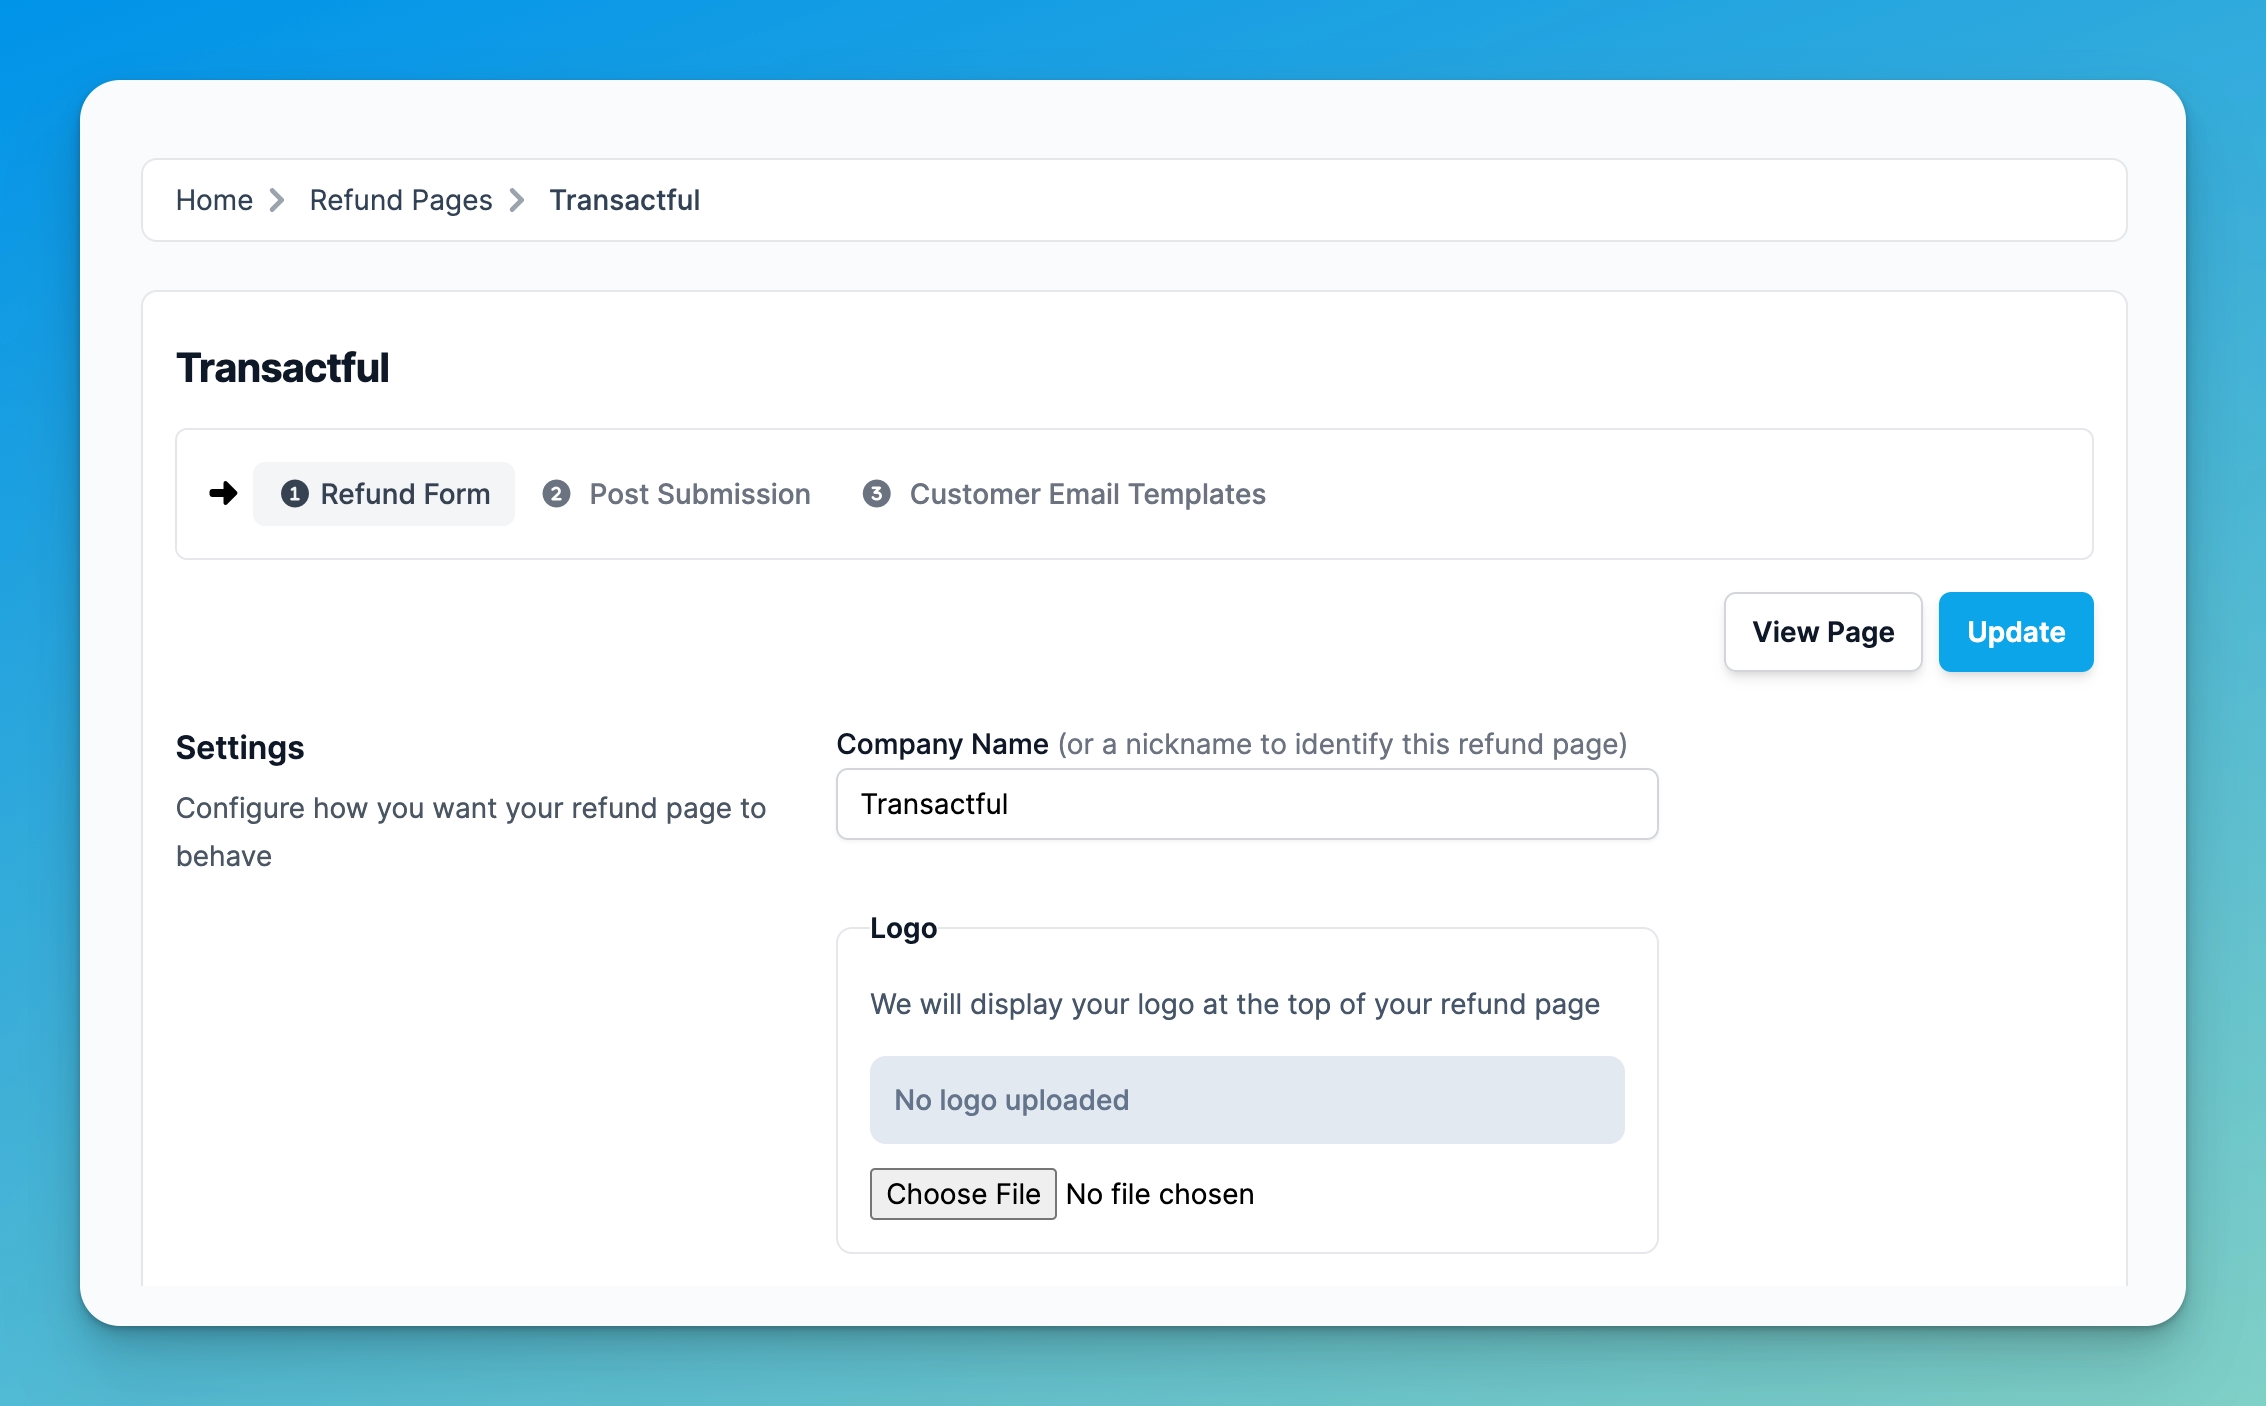
Once you are in the dashboard, you will be able to edit your just created Refund Page:
3. Configuring Refund Pages
Let's take a look at what options you have for configuring your Refund Pages.
There are two pages available to you:
- Refund form page, which the customer first sees when visiting your page
- Post submission page (which is also a refund status page), which customers see after submitting their refund request
Refund form page

There are several options available for you to edit.
General settings:
- Company Name (required): This should be the name of your company that the refund page represents. If you're operating multiple refund pages for the same company, we recommend that you add a suffix to it (eg. Awesome Co - Services Refund).
- Logo (optional): If you upload a logo, where possible we will use this in place of your Company Name.
- Icon (optional): Where applicable, such as for your page's favicon, we will use the icon you upload here.
- Show Transactful Branding (Paid Feature): By default, the refund page shows it was made on our app. You can hide this by de-selecting this checkbox.
- Refund Page URL (Paid Feature): When you set up your Refund Page, our system automatically created a unique identifier for this. You can customize it to your brand's name if you'd like. Below this you will see a short URL which you can use as a description for your credit card charges (with the domain of txtful.cc).
- Your homepage URL: Where applicable, we can link back to your website, such as with your Company Name or Logo.
- Page title: You can customize your page title for your Refund Page.
- Page meta description: You can customize your page's meta description, which would show in search engines.
Message settings:
- Preamble content: This is a short message at the top of the Refund Page. It is a good idea to use this space to remind visitors to this page why they are seeing the charge on their credit card.
Fields settings:
- Ask for email: By default, this is a required field. Transactful will ask customers filling out the request form for their email.
- Ask for name: By default, this is a required field. Customers filling out the request form will be asked for their name.
- Ask for telephone: To ask the customer for their telephone, enable this option. You also have the option to require that the customer completes this field.
- Ask for order number: To ask the customer for the order number they are requesting a refund for, enable this option. You also have the option to require that the customer completes this field.
- Ask for refund reason: To ask the customer for their telephone, enable this option. Transactful has a pre-populated list of options for the most common reasons which will be rendered to the customer.
- Ask for additional information: You may wish to enable this option if you want the customer to be able to type in additional information in their own words.
In addition to the above, you can optionally enable Transactful to send notifications to your customers:
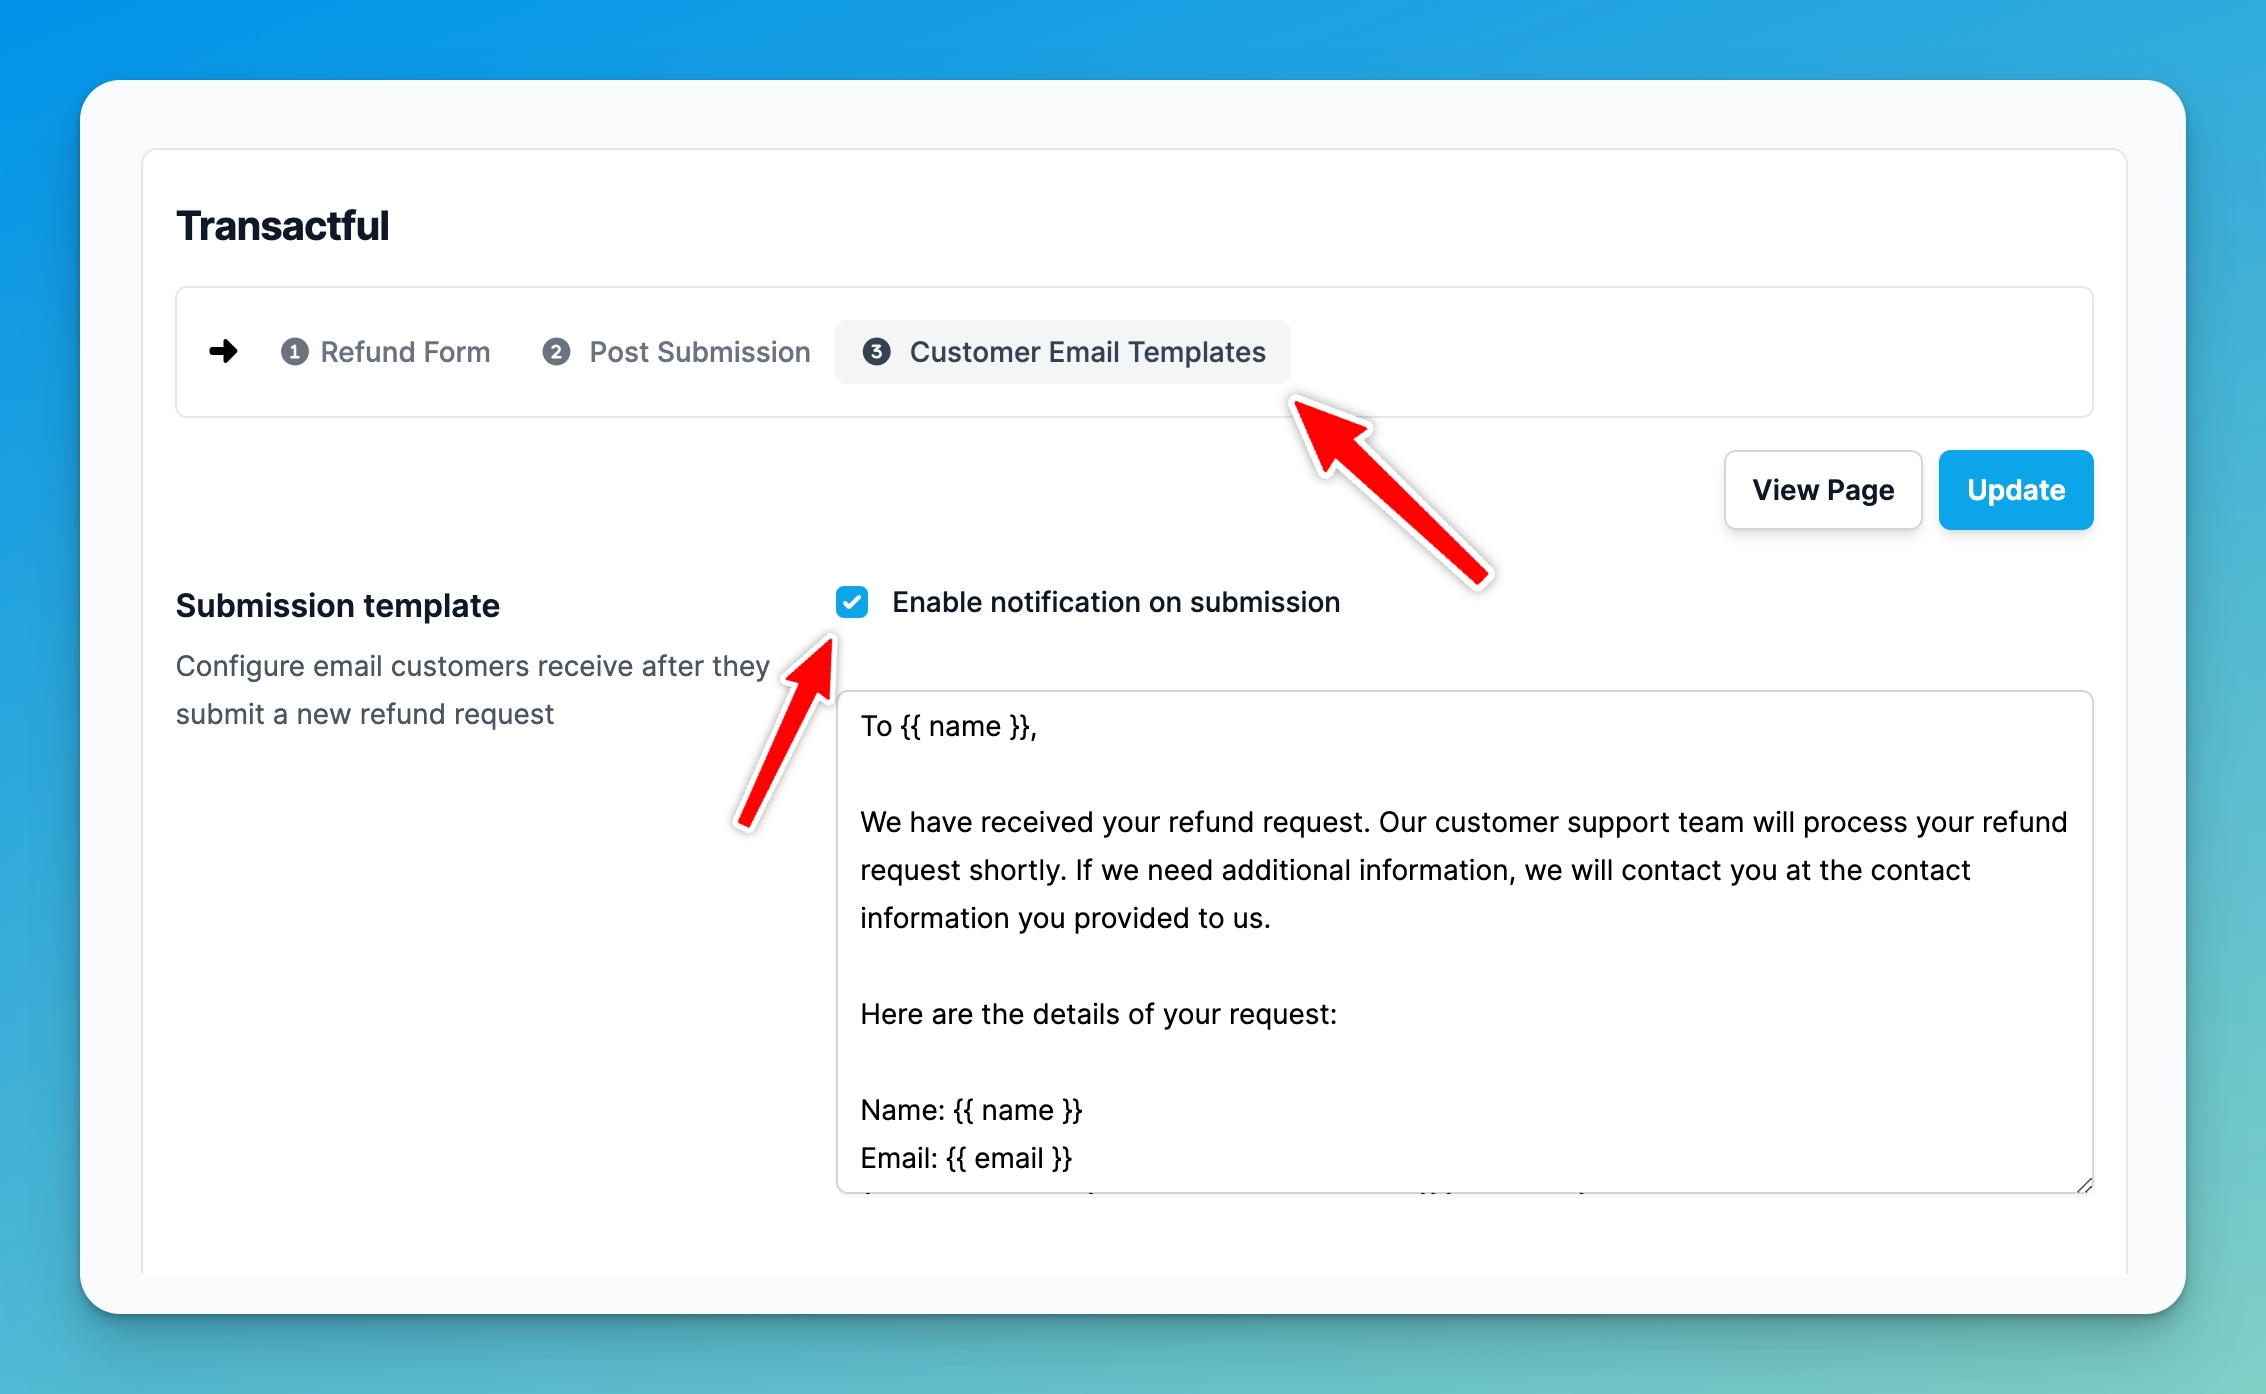
Click on Customer Email Templates, and you will see four events that can be configured to deliver notification emails to the customer:
- After Submission of the refund request
- After the request is marked as Processing
- After the request is marked as Resolved (but not refunded)
- After the request is granted a Refund
Once you enable each specific notification type, you can customize the email template which will be sent to the customer.
You will notice that there are certain placeholders (called variables), such as {{ name }}. These placeholders are used to substitute dynamic values (taken from the refund request information itself) and are automatically inserted into the email sent to the customer.
Here are a list of these placeholder variables you can use in the templates. Each placeholder must be surrounded by double curly braces.
- Customer's name
- Customer's email
- ** Customer's telephone
- ** Order number entered by the customer
- ** Refund request reason
- Your company name as set in your refund page settings
- Super secret URL of the refund request status for that particular customer
Note that if you enable notification for a particular event, the email text cannot be empty/blank. You must have a template so that our system can send the email to your customer for that particular event.
4. Reviewing Refund Requests
Refund requests can be viewed by clicking on Refund Requests on the sidemenu when you are logged into the dashboard.
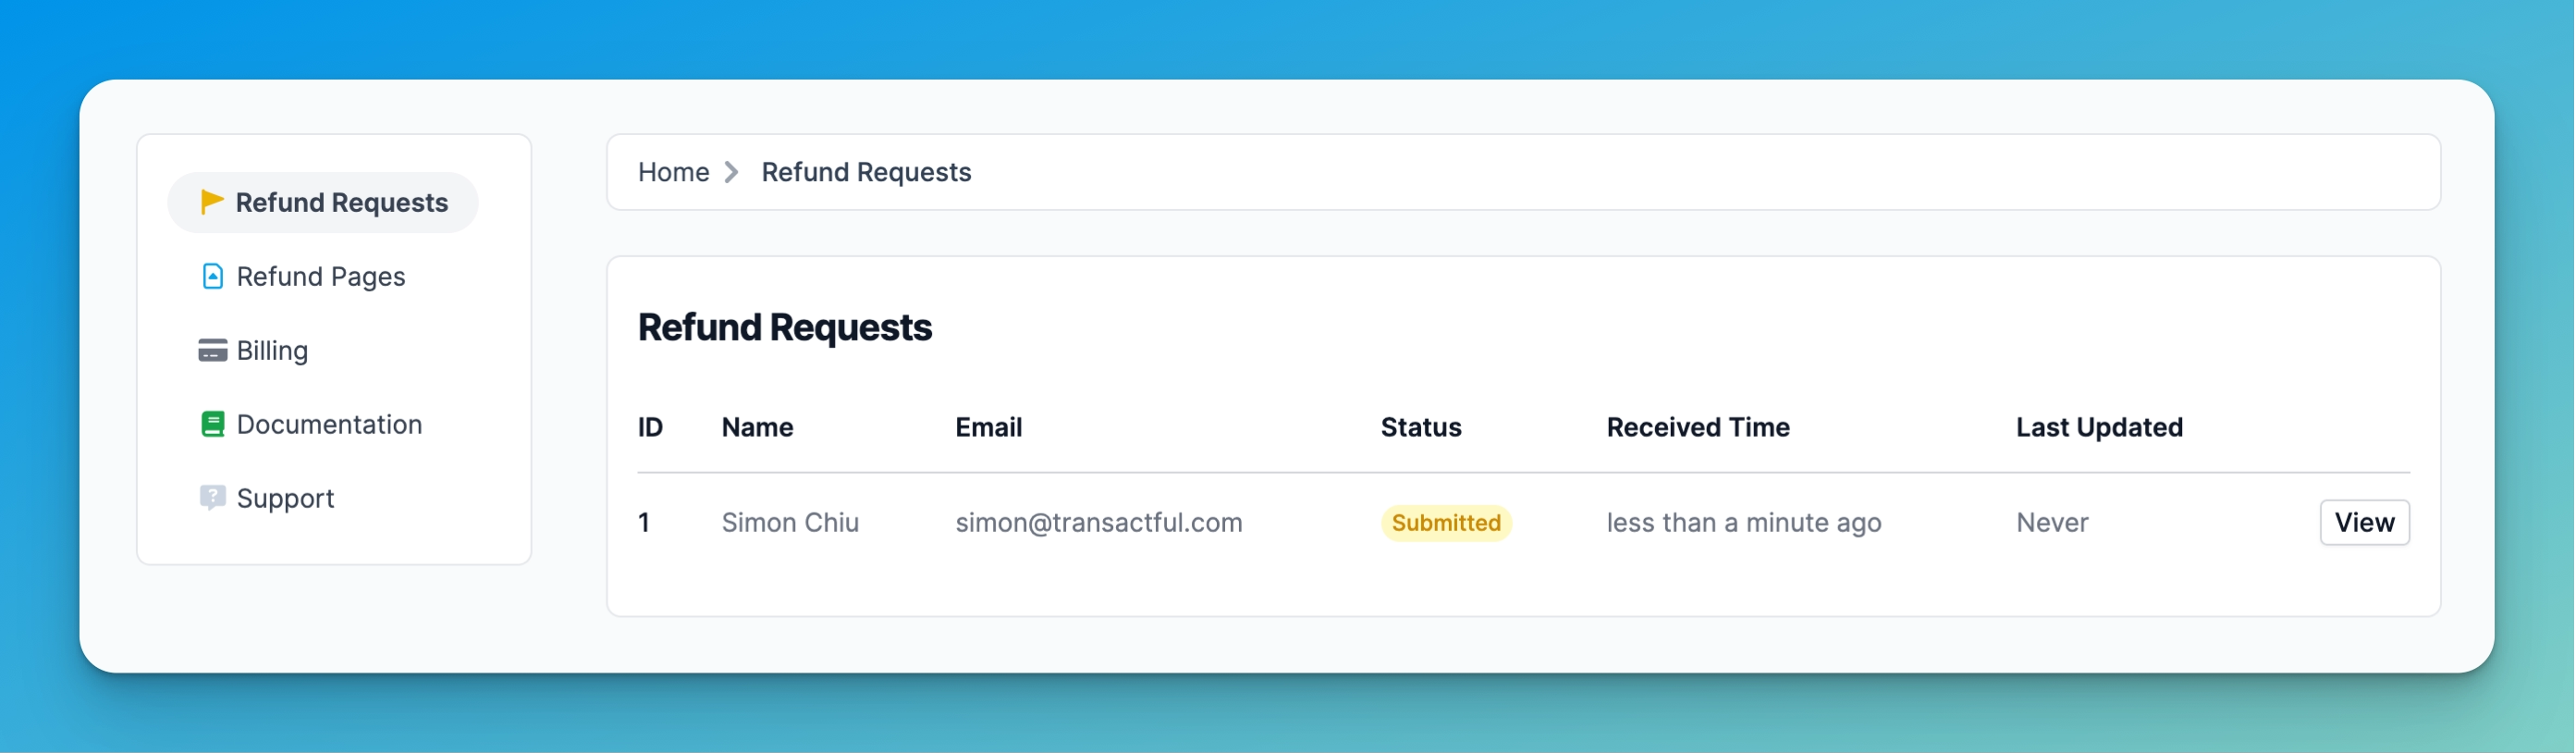
Clicking on the name and email addresses will allow you to easily copy them onto your clipboard in case you want to paste them into your customer support or emailing application.
You and your team will receive email notifications when refund requests are received by Transactful. When you receive this email, there is also a direct link to your dashboard page showing the refund request.
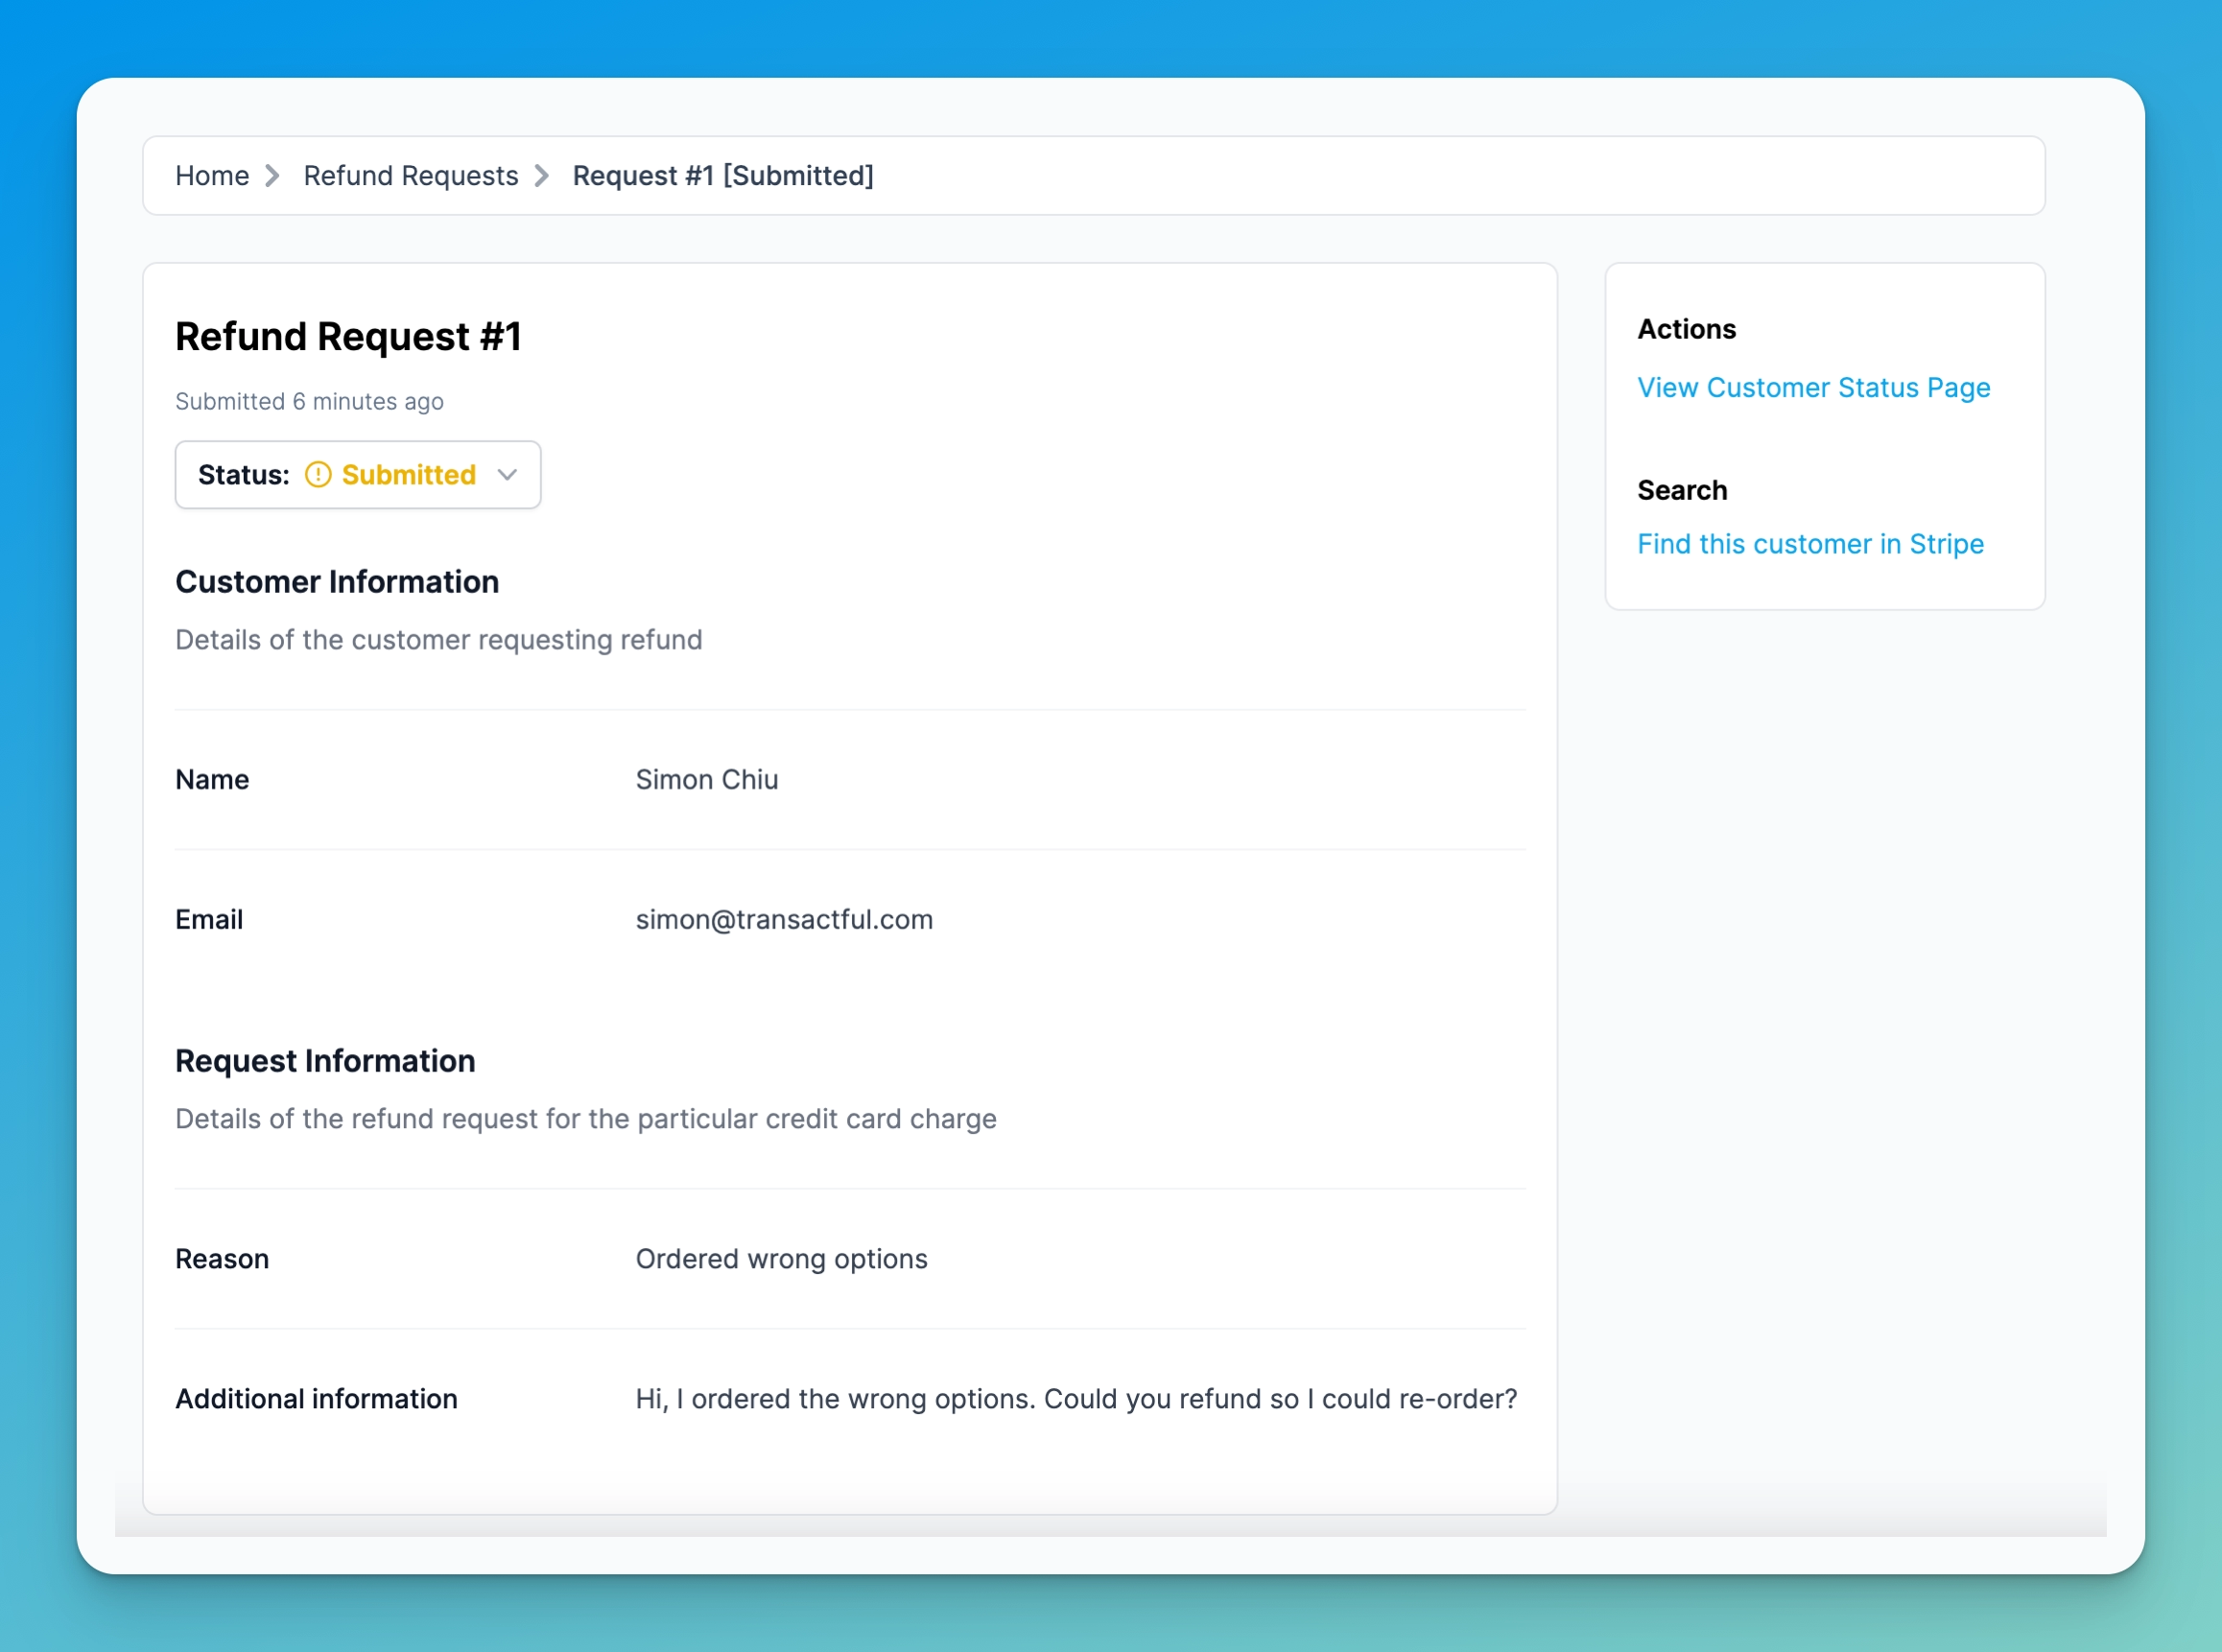
From this view, you can view:
- Name
- Telephone
- Reason for requesting a refund
- Any other information you asked
- IP address of the person who requested the refund
- Country of the requesting IP address
On the right hand side (desktop view) or at the bottom of the page (mobile view), you will see direct links to the refund request status page and a link to Stripe to search for this customer.
You can change the status of the refund request by clicking on the dropdown and selecting the new status.
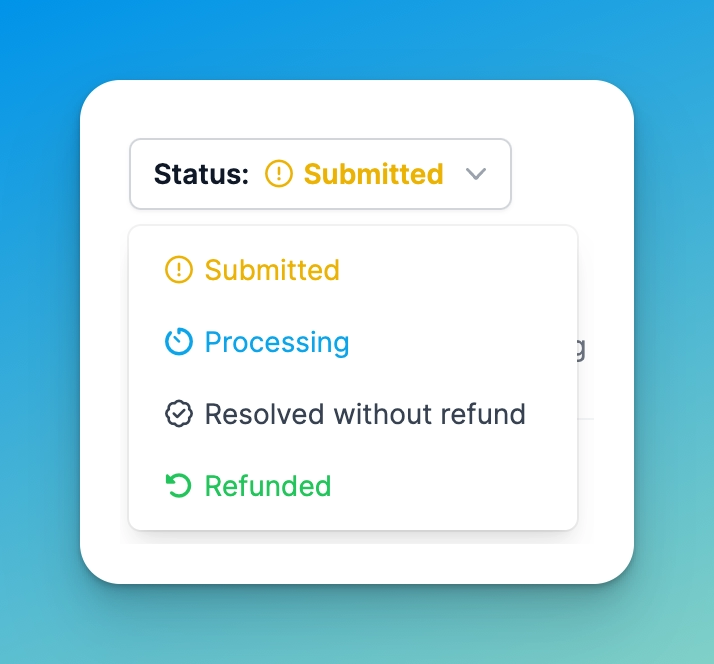
Note that when you update the status, it triggers a notification event for the customer if your refund page is set to notify customers for that event. For more information, please refer to the Configuring Refund Pages section.
5. Integrations
6. Billing
To purchase the premium plan, click on Billing and select the plan you want to subscribe to. You will be taken to Stripe which securely handles all the transaction details, such as protecting your credit card information.
Once subscribed, the Billing page will look like this:

To download your latest invoice (eg. for accounting purposes), click on Download your invoice. You can also manage your subscription settings directly at Stripe by clicking on the manage your billing link below that.
7. Request A Feature
We always welcome feature requests. Although we cannot promise that every single requested feature will be built, please send them our way so that we can be made aware of new and interesting use cases.
If you have any requests or ideas, please email [email protected].